Appearance
空间坐标
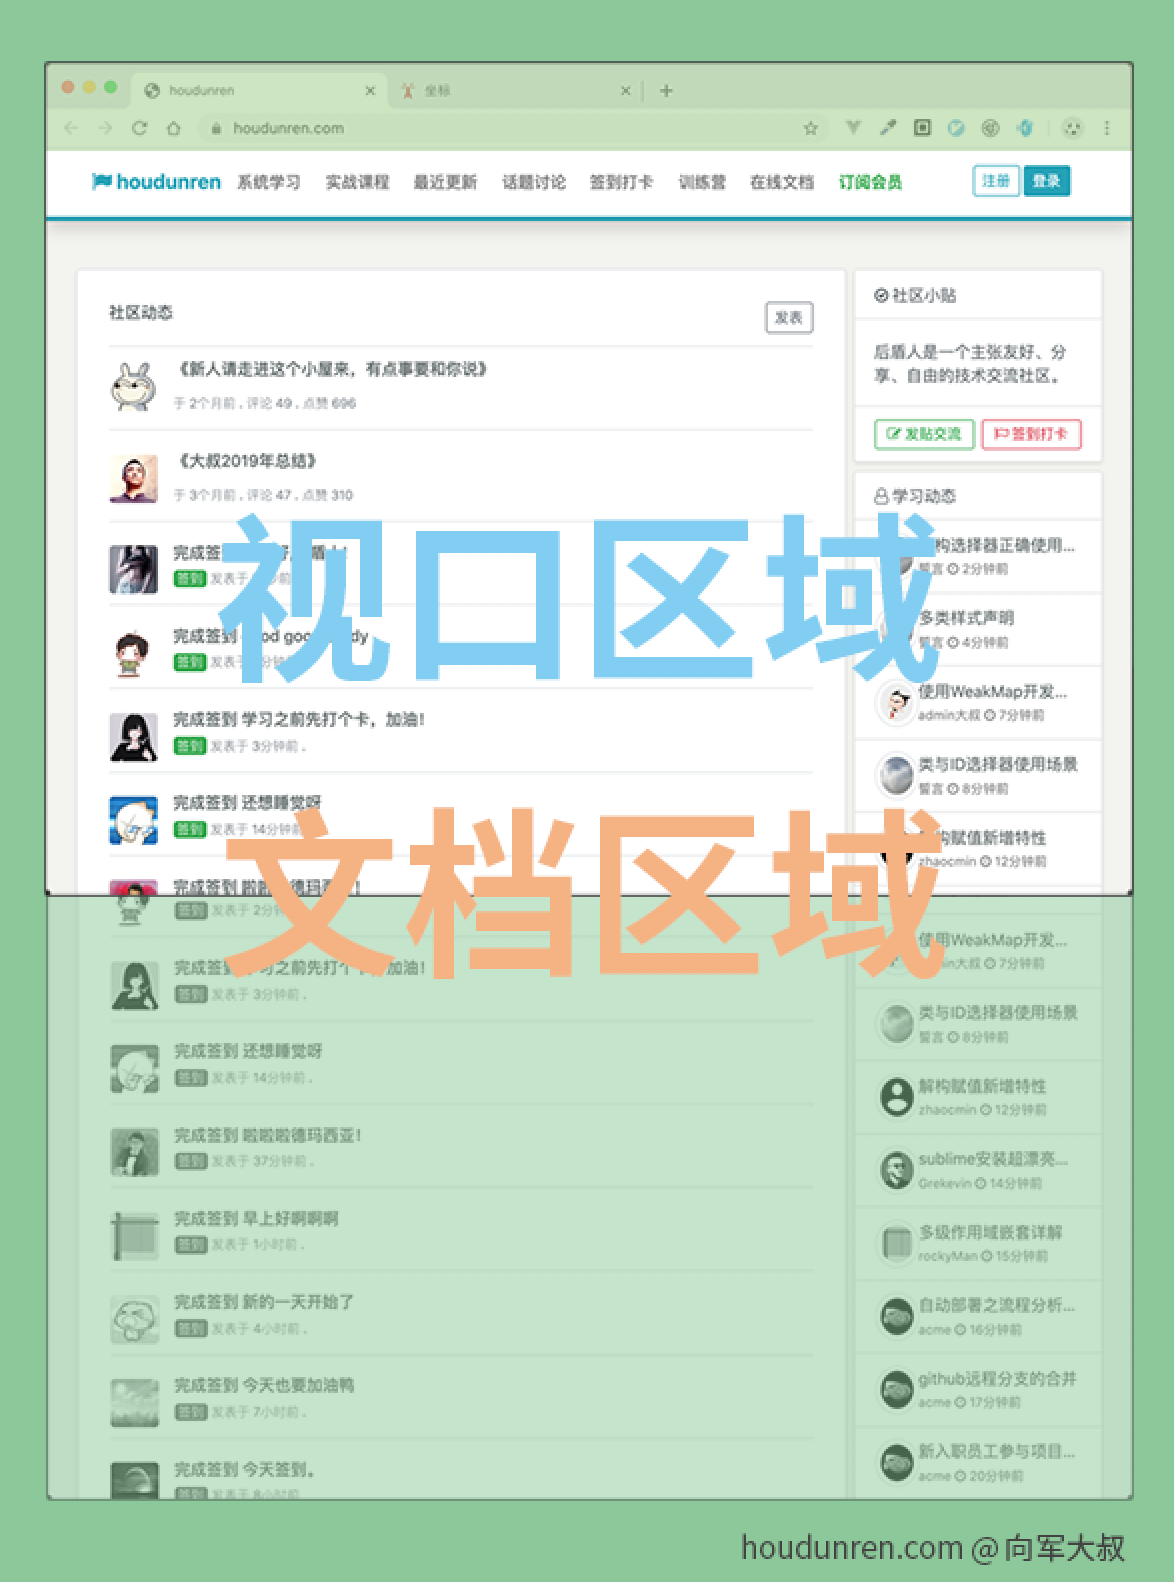
视口与文档
首先理解视口(窗口)与文档的含义
- 网页很多都是多屏(通过滚动条显示看不见的内容),所以文档尺寸一般大于视口尺寸
- 视口尺寸不包括浏览器工具条、菜单、标签、状态栏等
- 当你打开控制台后,视口尺寸就相应变小了
- position 使用文档定位,fixed 使用视口定位
- 文档坐标在页面滚动时不发生改变
- 视口坐标的操作需要考虑滚动条的位置
视口与文档尺寸
视口坐标需要知道滚动条位置才可以进行计算,有以下几种方式获取滚动位置
| 方法 | 说明 | 注意 |
|---|---|---|
| window.innerWidth | 视口宽度 | 包括滚动条(不常用) |
| window.innerHeight | 视口高度 | 包括滚动条(不常用) |
| document.documentElement.clientWidth | 视口宽度 | |
| document.documentElement.clientHeight | 视口高度 |
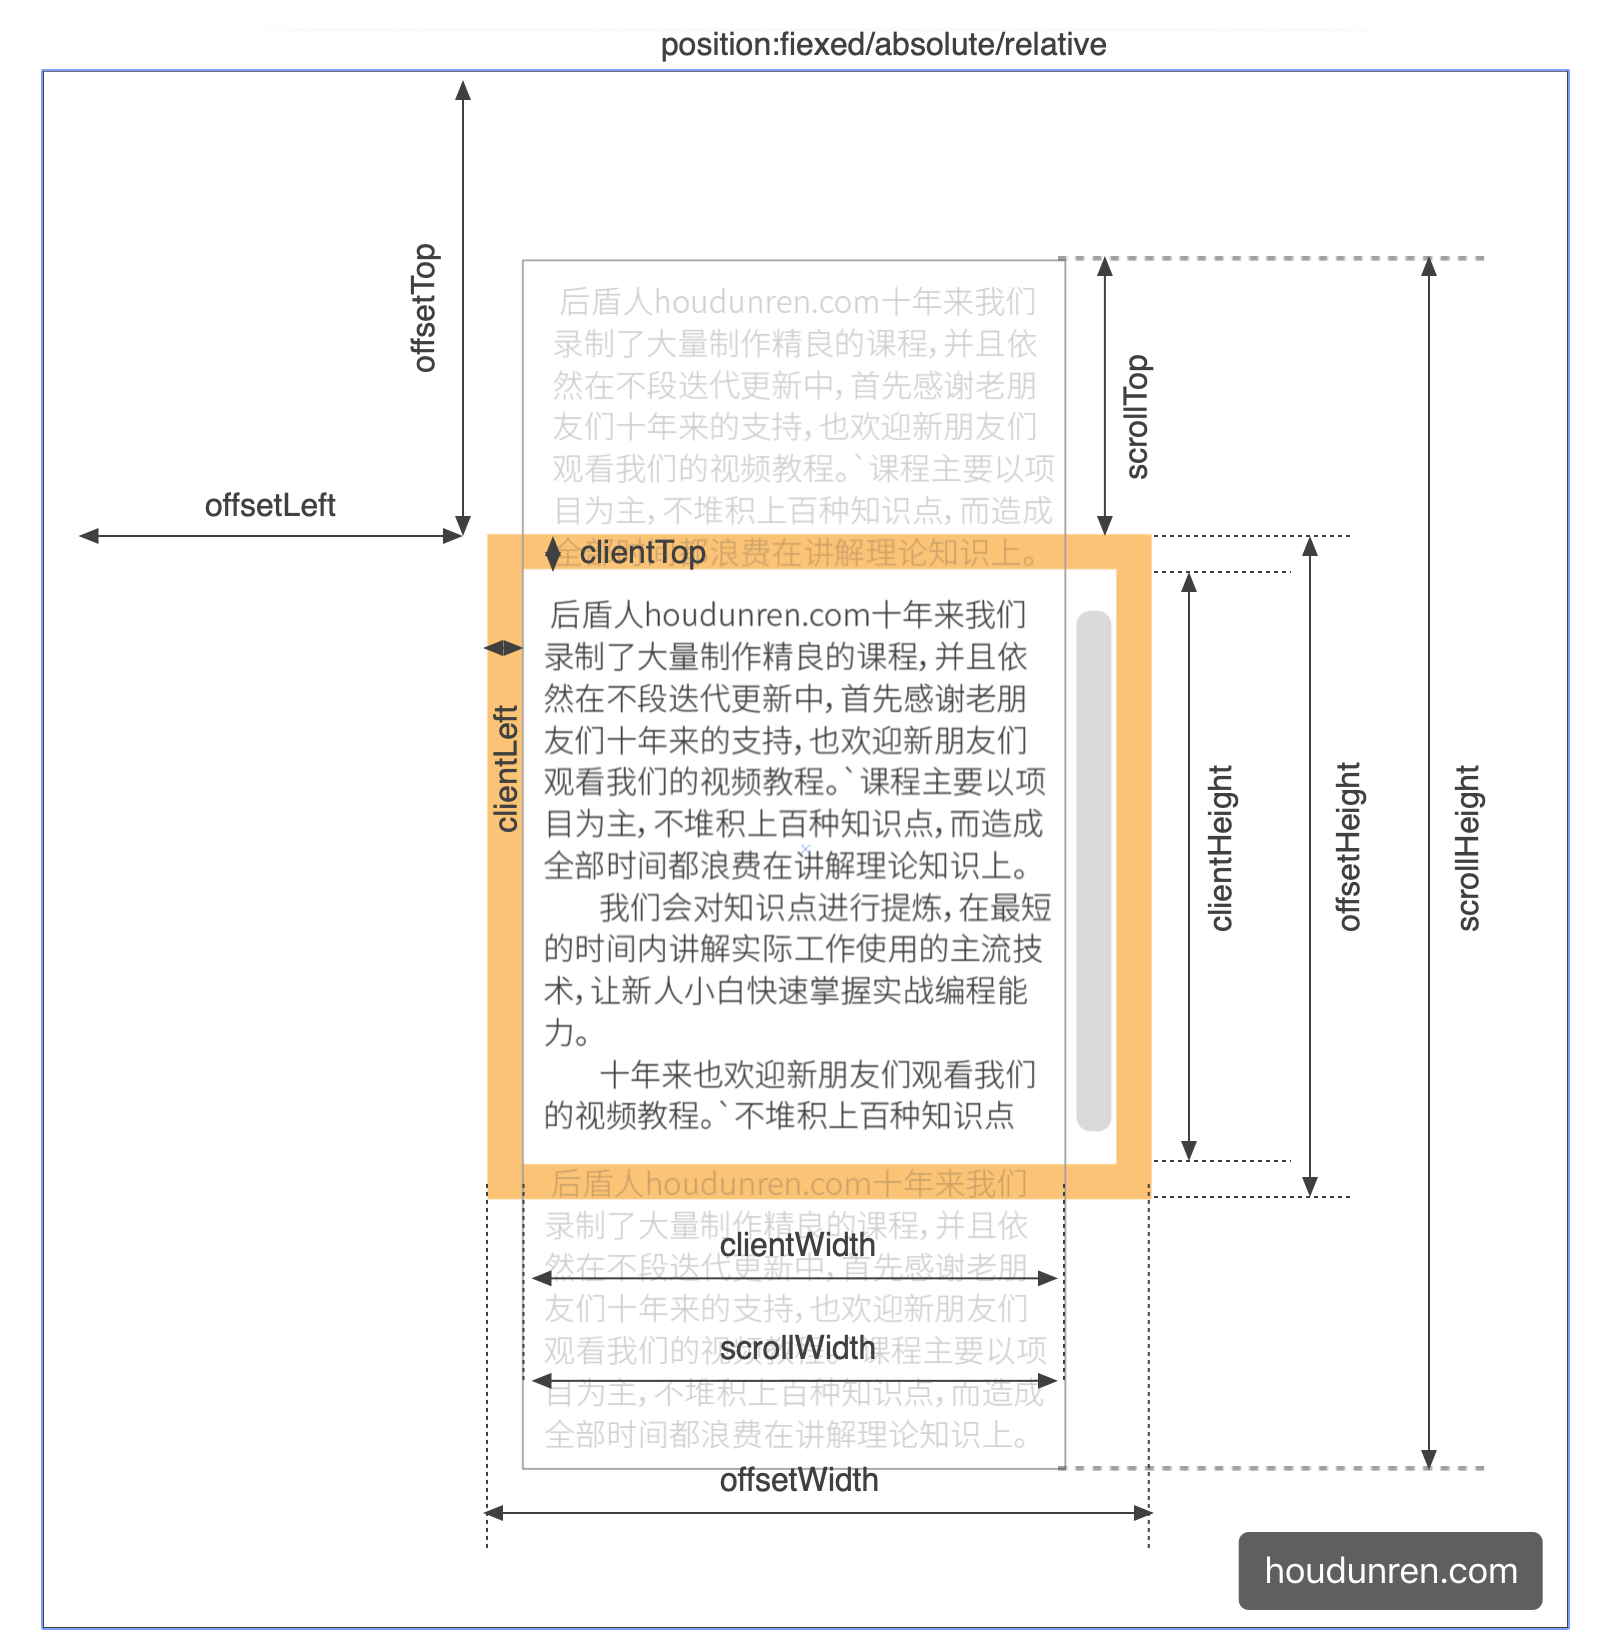
几何尺寸
元素在页面中拥有多个描述几何数值的尺寸,下面截图进行了形象的描述。
坐标都是从左上角计算,这与 CSS 中的 right/bottom 等不同
方法列表
下面是获取尺寸的方法或属性
| 方法 | 说明 | 备注 |
|---|---|---|
| element.getBoundingClientRect | 返回元素在视口坐标及元素大小,包括外边距,width/height 与 offsetWidth/offsetHeight 匹配 | 窗口坐标 |
| element.getClientRects | 行级元素每行尺寸位置组成的数组 | |
| element.offsetParent | 拥有定位属性的父级,或 body/td/th/table | 对于隐藏元素/body/html 值为 null |
| element.offsetWidth | 元素宽度尺寸,包括内边距与边框和滚动条 | |
| element.offsetHeight | 元素高度尺寸,包括内边距与边框和滚动条 | |
| element.offsetLeft | 相对于祖先元素的 X 轴坐标 | |
| element.offsetTop | 相对于祖先元素的 Y 轴坐标 | |
| element.clientWidth | 元素宽度,不包含边框,只包含内容和内边距,行元素尺寸为 0 | |
| element.clientHeight | 元素高度,不包含边框,只包含内容和内边距,行元素尺寸为 0 | |
| element.clientLeft | 内容距离外部的距离,滚动条在左侧时包括滚动条尺寸 | |
| element.clientTop | 内容距离顶部的距离,滚动条在顶部时包括滚动条尺寸 | |
| element.scrollWidth | 元素宽度,内容+内边距+内容溢出的尺寸 | |
| element.scrollHeight | 元素高度,内容+内边距+内容溢出的尺寸 | |
| element.scrollLeft | 水平滚动条左侧已经滚动的宽度 | |
| element.scrollTop | 垂直滚动条顶部已经滚动的高度 |
getComputedStyle
为什么有时不能使用 getComputedStyle
- 尺寸设置 auto 时获取结果不可用
- 由于滚动条的存在,不同浏览器返回结果不同
- 当元素没有设置 CSS 尺寸时,获取不到相应的尺寸内容
getBoundingClientRect
使用 getBoundingClientRect 获取元素相对于文档的几何坐标信息。
- 如果是标准盒子模型,元素的尺寸等于
width/height+padding+border-width的总和。 - 如果
box-sizing: border-box,元素的的尺寸等于width/height。

<style>
    * {
        padding: 0;
        margin: 0;
    }
    main {
        padding: 200px;
        position: relative;
    }
    #app {
        width: 200px;
        background: #e34334;
        margin: 100px;
        padding: 50px;
        border: 20px solid #efbc0f;
        color: white;
        text-align: center;
    }
</style>
<main>
    <div id="app">houdunren.com</div>
</main>
<script>
    let app = document.getElementById('app')
    let info = app.getBoundingClientRect()
    console.table(info)
</script>
计算结果的矩形尺寸包括外边距,不包括边框与内边距,上例计算结果如下
| 尺寸 | 值 |
|---|---|
| x | 300 |
| y | 300 |
| width | 340 |
| height | 162.40000915527344 |
| top | 300 |
| right | 640 |
| bottom | 462.40000915527344 |
| left | 300 |
getClientRects
getClientRects 用于返回多行元素所占的尺寸,下面示例将为每行返回所占的空间尺寸
<style>
	span {
    width: 200px;
    overflow: auto;
  }
</style>

<span>
网页很多都是多屏,所以文档尺寸一般大于视口尺寸,当打开控制台后,视口尺寸相应变小。网页很多都是多屏,所以文档尺寸一般大于视口尺寸,当打开控制台后,视口尺寸相应变小。网页很多都是多屏,所以文档尺寸一般大于视口尺寸,当打开控制台后,视口尺寸相应变小。
</span>
<script>
  let span = document.querySelector('span')
  let info = span.getClientRects()
  console.log(info)
</script>
上例计算结果如下
| (index) | x | y | width | height | top | right | bottom | left | 值 |
|---|---|---|---|---|---|---|---|---|---|
| 0 | 8 | 8 | 1496.4500732421875 | 22.399999618530273 | 8 | 1504.4500732421875 | 30.399999618530273 | 8 | |
| 1 | 8 | 30.399999618530273 | 436.2250061035156 | 22.399999618530273 | 30.399999618530273 | 444.2250061035156 | 52.79999923706055 | 8 | |
| length | 2 |
坐标点元素
JS 提供了方法获取指定坐标上的元素,如果指定坐标点在视口外,返回值为 NULL
- 坐标都是从左上角计算,这与 CSS 中的 right/bottom 等不同
- 窗口坐标类似于 position:fixed
- 文档坐标类似于 position:absolute
| 方法 | 说明 |
|---|---|
| element.elementsFromPoint | 返回指定坐标点所在的元素集合 |
| element.elementFromPoint | 返回指定坐标点最底层的元素 |
元素集合
返回指定坐标点上的元素集合
<style>
  div {
    width: 200px;
    height: 200px;
  }
</style>
<div></div>
<script>
  const info = document.elementsFromPoint(100, 100)
  console.log(info)
</script>
返回结果为
0: div
1: body
2: html
底层元素
返回坐标点上的底层的元素
<style>
  div {
    width: 200px;
    height: 200px;
  }
</style>
<div></div>
<script>
  const info = document.elementFromPoint(100, 100)
  console.log(info)
</script>
返回结果为
div滚动控制
下面掌握文档或元素的滚动操作
方法列表
| 方法 | 说明 | 说明 |
|---|---|---|
| element.scrollLeft | 获取和设置元素 X 轴滚动位置 | |
| element.scrollTop | 获取和设置元素 Y 轴滚动位置 | |
| element.scrollBy() | 按偏移量进行滚动内容 | 参数为对象,{top:垂直偏移量,left:水平偏移量,behavior:'滚动方式'} |
| element.scroll() 或 element.scrollTo() | 滚动到指定的具体位置 | 参数为对象,{top:X 轴文档位置,left:Y 轴文档位置,behavior:'滚动方式'} |
| element.scrollIntoView(bool) | 定位到顶部或底部 | 参数为 true 元素定位到顶部,为 false 定位到窗口底部 |
文档滚动位置
下例是查看文档滚动的 X/Y 坐标示例,请在控制台查看结果
<div style="width: 3000px; height: 3000px; background: #e34334"></div>
<script>
    window.onscroll = function () {
        console.log(document.documentElement.scrollTop)
        console.log(document.documentElement.scrollLeft)
    }
</script>
也可以使用 window.pageXOffset 对象属性获取
<div style="width: 3000px; height: 3000px; background: #e34334"></div>
<script>
    window.onscroll = function () {
        console.log(window.pageXOffset)
        console.log(window.pageYOffset)
    }
</script>
元素滚动位置
下面查看元素内容的滚动属性,请在控制台查看结果
- 要为元素设置 overflow:auto 以使其产生滚动条
- 使用 scroll 事件来监听结果
<div id="app" style="width: 300px; height: 300px; border: solid 6px #e34334; overflow: auto">
    <div style="width: 1000px; height: 1000px; background: #833ca4"></div>
</div>
<script>
    const app = document.getElementById('app')
    app.addEventListener('scroll', function () {
        console.log(this.scrollLeft)
        console.log(this.scrollTop)
    })
</script>
控制滚动
下面介绍的是控制元素滚动的操作方法
scrollBy
使用 scrollBy 滚动文档
- behavior:smooth 为平滑滚动
<style>
  body {
    height: 3000px;
  }
</style>

<script type="module">
  setInterval(() => {
    document.documentElement.scrollBy({ top: 30, behavior: 'smooth' })
  }, 100)
</script>
scroll
使用 scroll 滚动到指定位置
- behavior:smooth 为平滑滚动
<style>
  body {
    height: 3000px;
  }
</style>

<script type="module">
  setTimeout(() => {
    document.documentElement.scroll({ top: 30, behavior: 'smooth' })
  }, 1000)
</script>
scrollIntoView
使用元素 scrollIntoView 方法实现滚动操作,参数可以是布尔值或对象
- 参数为 true 时顶部对齐,相当于
- 参数为 false 时底部对齐,相当于
- 也可定义 {behavior:'smooth'} 来进行平滑滚动
<style>
    div {
        height: 2000px;
        background: red;
        border-top: solid 50px #efbc0f;
        border-bottom: solid 50px #1bb491;
    }
    span {
        border-radius: 50%;
        color: #fff;
        background: #000;
        width: 50px;
        height: 50px;
        display: block;
        text-align: center;
        line-height: 50px;
        position: fixed;
        top: 50%;
        right: 50px;
        border: solid 2px #ddd;
    }
</style>
<div id="app">hdcms.com</div>
<span>TOP</span>

<script>
    document.querySelector('span').addEventListener('click', () => {
        let app = document.querySelector('#app')
        app.scrollIntoView({ block: 'end', behavior: 'smooth' })
    })
</script>
回到顶部
下例是开发中常用的回到顶部示例
<style>
    * {
        padding: 0;
        margin: 0;
    }
    span {
        width: 50px;
        height: 50px;
        background-color: #e34334;
        color: #fff;
        display: flex;
        justify-content: center;
        align-items: center;
        text-align: center;
        position: fixed;
        right: 50px;
        bottom: 50px;
        border-radius: 10px;
        opacity: 0;
        transition: 1s;
        cursor: pointer;
    }
    span.show {
        opacity: 1;
        transform: rotate(360deg);
    }
</style>

<div id="app" style="height: 2000px">
	houdunren.com@向军大叔
</div>

<span id="bt">TOP</span>

<script>
    window.addEventListener('scroll', () => {
    		// 判断是否距离页面底部200px
        let state = document.documentElement.offsetHeight - 200 < document.documentElement.scrollTop + document.documentElement.clientHeight

				// 按钮元素
        const span = document.querySelector('span')

        // 根据滚动位置添加或移除类
        span.classList[state ? 'add' : 'remove']('show')
    })

    // 回到顶部按钮事件
    document.querySelector('#bt').addEventListener('click', function () {
        // 平滑回滚到页面顶部
        document.documentElement.scrollIntoView({ block: 'start', behavior: 'smooth' })
    })
</script>
漂浮广告
下面是全屏漂浮广告的示例
<main>
    <div id="app" style="width: 200px; height: 200px; background:#E34334">houdunren.com</div>
</main>
<script>
    class Ad {
        constructor(options) {
            this.$el = document.querySelector(options.el)
            this.$options = Object.assign({ timeout: 2, step: 1 }, options)
            //初始移动方向,1向下/向右 -1 向上/向左
            this.x = this.y = 1

            // 设置定位模式
            this.$el.style.position = 'fixed'
            setInterval(this.run.bind(this), this.$options.timeout)
        }
        //定时回调函数
        run() {
            this.$el.style.left = this.left() + 'px'
            this.$el.style.top = this.top() + 'px'
        }
        left() {
            let { x, width } = this.$el.getBoundingClientRect()
            let { clientWidth } = document.documentElement
            if (x > clientWidth - width) this.x = -1
            if (x < 0) this.x = 1

            return x + this.x * this.$options.step
        }
        top() {
            let { y, height } = this.$el.getBoundingClientRect()
            let { clientHeight } = document.documentElement
            if (y > clientHeight - height) this.y = -1
            if (y < 0) this.y = 1

            return y + this.y * this.$options.step
        }
    }

    new Ad({ el: '#app', timeout: 10, step: 1 })
</script>